
It has been quite a non-productive week! I really don't know where time has gone and here we are, it is the weekend again. I have made and sewn together quite a few yo-yos for a cushion I am making! You will need to buy a large Clover Yo-yo Maker and the included instructions are very explicit and written in English, French, Spanish and Dutch. They cost around the $10 here in Australia, so it is not really an expensive little gadget. Very worthwhile!.jpg) The translucent yellow plastic is the plate and the bright yellow the disk. I have used some charm squares, but scraps approximately 5 inches square will do nicely!
The translucent yellow plastic is the plate and the bright yellow the disk. I have used some charm squares, but scraps approximately 5 inches square will do nicely!
.jpg) The wrong side of the fabric is placed behind the disk and the the disk is inserted into the plate. plate. There are little markers showing you where to align the plate and the disk.
The wrong side of the fabric is placed behind the disk and the the disk is inserted into the plate. plate. There are little markers showing you where to align the plate and the disk..jpg) The fabric is then trimmed back approx 3/16" from the edge of the plate.
The fabric is then trimmed back approx 3/16" from the edge of the plate..jpg) Oopsy! A storm was brewing while I was trying to take pics, so I had to step outside to get a nice clear picture.
Oopsy! A storm was brewing while I was trying to take pics, so I had to step outside to get a nice clear picture..jpg) This is a little difficult to explain in pics, but I will try! I use fine quilting thread for this step. See the little slots on the back of the plate - the needle is inserted from the other side and carried in and out around the plate through these slots.
This is a little difficult to explain in pics, but I will try! I use fine quilting thread for this step. See the little slots on the back of the plate - the needle is inserted from the other side and carried in and out around the plate through these slots..jpg) When one has finished stitching right around the plate, the plate is then removed and this is what you will see. Look closely and you will see the little stitches. Perhaps I should have used a dark, contrasting thread - never mind! - as I said, you will get great instructions if you decide this is for you.
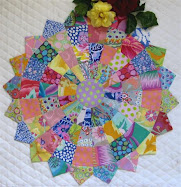
When one has finished stitching right around the plate, the plate is then removed and this is what you will see. Look closely and you will see the little stitches. Perhaps I should have used a dark, contrasting thread - never mind! - as I said, you will get great instructions if you decide this is for you..jpg) Now, by drawing up this thread, and with a little bit of manipulating, you will have a beautifully formed yo-yo with a diameter of 1-5/8" approximately! I think 8 x 8 = 64 will give me a nice 14" cushion!
Now, by drawing up this thread, and with a little bit of manipulating, you will have a beautifully formed yo-yo with a diameter of 1-5/8" approximately! I think 8 x 8 = 64 will give me a nice 14" cushion!♥
This little demo is to illustrate just how easy it is to make lovely, neat yo-yos very quickly. It is a nice portable project, good for times when you are at a sewing gathering - quite mindless, allowing quality time to chit-chat, LOL! It is intended to give you an insight into this method should you wish to have a little play!
♥
Happy weekend!

.JPG)
.JPG)
.jpg)
.jpg)
.jpg)
.jpg)
.jpg)
.jpg)
.jpg)

.jpg)


