
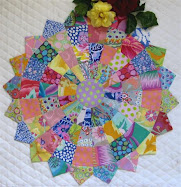
.jpg) I was going to start some applique yesterday - guess what? - Pages 17 - 30 in a new book were missing and they were the pages I needed. Bad luck - so I decided I will do a little demo for those who wanted to know, on how to make perfect pinwheels (as I've said before, is anything perfect?)!
I was going to start some applique yesterday - guess what? - Pages 17 - 30 in a new book were missing and they were the pages I needed. Bad luck - so I decided I will do a little demo for those who wanted to know, on how to make perfect pinwheels (as I've said before, is anything perfect?)!
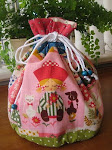
The above will become an 8" potholder - a first for me! This is not a copy, but I will say, I have been inspired by Nanette of Freda's Hive in my selection of cutesy fabrics! I have quite a nice stash of them these days . Thanks, Nanette!.jpg) One needs 4 squares of chosen fabrics with a diagonal line, corner to corner, drawn on the lighter fabric. My finished pinwheel is going to be 4" (that is 4-1/2" with seam allowances), so each half needs to be 2", plus 1/2" seam allowance, plus 3/4", making the squares 3-1/4". These allowances can be applied to all sizes of pinwheels.
One needs 4 squares of chosen fabrics with a diagonal line, corner to corner, drawn on the lighter fabric. My finished pinwheel is going to be 4" (that is 4-1/2" with seam allowances), so each half needs to be 2", plus 1/2" seam allowance, plus 3/4", making the squares 3-1/4". These allowances can be applied to all sizes of pinwheels.
.jpg) Oopsy, tilt you head! - stitch 1/4" each side of diagonal line.
Oopsy, tilt you head! - stitch 1/4" each side of diagonal line..jpg) Cut on the drawn line. Press seam allowance towards darker fabric.
Cut on the drawn line. Press seam allowance towards darker fabric..jpg) Place you square ruler on the 45 degree angle line as shown above and with rotary cutter, trim to 2-1/2", first trimming the right side and the top side, then turn the square around and trim the other two sides.
Place you square ruler on the 45 degree angle line as shown above and with rotary cutter, trim to 2-1/2", first trimming the right side and the top side, then turn the square around and trim the other two sides..jpg) Then you can see the neat squares we have achieved. Lay out as illustrated above.
Then you can see the neat squares we have achieved. Lay out as illustrated above..jpg) Stitch left and right pairs together, starting at edge where there are no seam allowances.
Stitch left and right pairs together, starting at edge where there are no seam allowances..jpg) Finger press seams towards darker fabric, so the seams lay in opposite directions.
Finger press seams towards darker fabric, so the seams lay in opposite directions..jpg) Stitch both pairs together, making sure you interlock the seams.
Stitch both pairs together, making sure you interlock the seams..jpg) There we have the perfect pinwheel! Look at those lovely points in the middle!
There we have the perfect pinwheel! Look at those lovely points in the middle!♥


.jpg)


29 Lovely People said ...:
Cute potholder Lurline!
Thank you so much for this, Lurline. I've been planning a pinwheel quilt in my head for a few weeks now, so you lovely clear tutorial will help enormously.
I cannot wait to try this. Great tutorial. I can't wait to get back in my sewing room. We have had a lot going on lately but hopefully next week will be easier. Thanks for showing us this.
What cute fabric choices for your demo.
Thanks Lurline,
This will help me get my pinwheels more accurate.
Hugs Julia ♥
What an adorable pot holder! I love the fabric you used!
Thank you Lurline, this is the tutorial I have been waiting for, they use to be my favorite blocks to make but somehow I seem to have forgot something and my points never match anymore. thank you, I cannot wait to try yours out!! BTW love the fabric you choose for the tutorial !!
Thanks Lurline, good demo and I know it is not as easy as it looks. Your sewing lines are perfect lines. Natima
I've always done pinwheels that way too, makes it just too easy, no stress, I like that. Oh and your points are beautiful!!
Thank you for your Comment and assurance, Lizzie ... I hope other folk read it, so they realize the little extra work is worth the effort! Hugs - Lurline♥
This is the perfect tutorial to me, and sooo clever ! I had already heard about that method, but never saw it "in real", step by step, as you're showing it. THANKS a bunch, Lurline !
By the way, did I ever tell you I'm in LOVE with your blog header ? These little "ladies", all dressed up are so cute ! Could you explain how you make them (measures, etc..), one of these days, pleazzzze, Lurline ? ;>)
XOXOXOXOXOXOXOXO
NADINE
That is one cute pot holder. Thanks for sharing your pin wheels method.
I love the cutesy fabrics in the potholder. I do my pinwheels the same. Do you not pin?
tut tut your very welcome,thanks for the plug.
I am quilting the first quilt on my machine since the holidays and loveing it.
cheers
Christine
Great tutorial Lurline...just perfect
Thank you Lurline...I have never done pin wheels but will remember this. I love pot holders...I reckon you can never have enough!!! Hope you had a lovely Easter break. BTW, fab article ♥x
PS...the one in the magazine I mean...
....tour tutorial has inspired me to make pinwheels today. Thanks!
Thank you - very nicely explained. I must try this out. Being quite new to this, some of these blocks look very hard to do and some other explanations I have found very hard to follow.
Great little tute Lurline! 8-)
Thanks for taking the time to do this!
Happy stitchings!
Hello, Friend of Micki's here and got your blog from her link.. I must say that I have always not been a fan of pinwheels but I followed your instructions and VOILA'.. GOOD POINTS.. I will certainly use this in the future..Love that little block..
Maggey
Hey now, that's a great way to do that! Thanks for the perfect method. :)
Your potholder looks so cute!
Thanks for sharing, tips are always welcome!
Hi Lurline, love your pot holder, very snazzy, pinwheels are one of my favourites as well.
Great tutorial! The pinwheels turned out spectacular!
Micki
Hi Lurline! What a great tutorial and very helpful to me! Much easier trimming units than the finished block!
Hugs - Shari
ohhh thank you! I want to start a pinwheel quilt!
Corrie:)
hi from ARGENTINA, YOUR QUILT ARE BEAUTIFUL
Post a Comment